Showing posts with label tips and tricks. Show all posts

Friday, February 10, 2017

GNU/Linux shell: A bit of random

From a number of different tasks of equal priority listed in a file (for the sake of argument listed in the lines 123 through 321) I wanted to choose the next one to perform in a random manner using ordinary shell tools. I came up with this solution:
    seq 123 312 | sort -R | head -1
This generates a sequence from 123 through 321, sorts it in a random manner and prints the first number of the randomized list.

This solution neither generates cryptographic random numbers nor saves memory or CPU time but it is straightforward and does the job at hand without any fancy tools or tricks. Perhaps you like it.

Friday, January 17, 2014

PDF to animated GIF

In order to illustrate how fragmentation occurs, I created a PDF document (Fragmentierung.pdf) with one page for each step of the fragmentation.


 This is how I converted it to an animated GIF. The first step was to create a series of PPM files, one file for each page. The option -r 384 sets the resolution to 384 dpi. This somewhat odd resolution is four times 96 dpi which in turn is the resolution of the PDF being converted.


The pdftoppm command generates files that are numbered.


The files resulting from this conversation are huge in both display and storage size so the next step is to rescale them to a reasonable resolution. My choice was a width of 800 times 600. the for loop iterates over all PPM files, the output of the pamscale command sent to a file with a name based on the original file name using the shell's own capability to process strings. Finally, the --filter option controls how precisely the original high-resolution image is mapped to the low resolution one.

Let's assume the original file name is Fragmentierung-1.ppm. Then ${i%.ppm} yields Fragmentierung-1 and ${i%.ppm}_new.ppm results in Fragmentierung-1_new.ppm.


The result of this command - which on my old machine requires a considerable amount of time - is a new series of files that are considerably smaller than the original ones.


As the old files are no longer needed, I replace them with the corresponding new ones.


Now we have ppm files of the right size that are simply numbered.


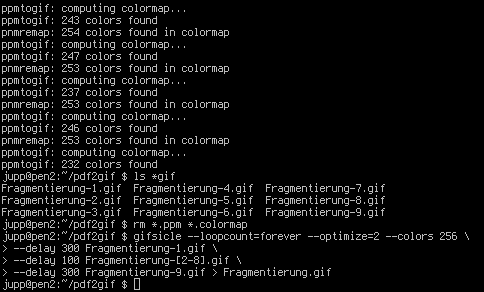
The PPM files usually have more than 256 colors (which is the maximum for GIFs). For this reason I use pnmcolormap to generate colormaps for the individual files that have no more than 256 colors.


This command results in tons of diagnostics output created by pnmcolormap.


The next command performs two tasks at the same time: pnmremap uses the colormap to map the original colors to no more than 256 with the -fs option making sure that Floyd-Steinberg dithering is used. Then the output converted to GIF formatusing ppmtogif and is written to a file with the file name extension .gif.


In this case both commands are a bit chatty so you again get lots of output.


Now we are almost done as we have a set of GIF files.


Just discard all the intermediary files. The next command looks complicated like hell but it isn't. gifsicle generates an animated GIF from a number of input files that need to be in GIF format.

  • --loopcount=forever makes the animation loop forever (i.e. after displaying the last frame of the animation it always restarts with the first one)
  • --optimize=2 optimizes the generated file as much as possible (without this option the file gets even bigger)
  • --colors=256 makes sure that the generated file has no more than 256 colors. This may seem superflous as each input file already has no more than 256 colors but the colors may happen to be different so that the overall number can be larger than 256.

The most important part of the command is the --delay options. If you provide this option, it applies to each image that follows up to the next command. Hence, in this case the first delay of 3 seconds applies to Fragmentierung-1.gif only, the delay of 1 seconds to Fragmentierung-2.gif through Fragmentierung-8.gif and the second delay of 3 seconds to Fragmentierung-9.gif.


Finally done. Here is the animated gif that results from this effort.

Wednesday, September 19, 2012

Obtaining Tweeted Images in Original Size

An increasing number of tweets contains images uploded to twitter. Here is one example:
A particular example

I assume that you know how to find out URLs of images that are used on a web page.

The URL of the image you see in the tweet is https://pbs.twimg.com/media/A0BRGqGCcAEBdHW.jpg with the dimensions 600px × 428px (scaled to 435px × 310px).

If you click on the image to obtain a larger version you are presented with https://pbs.twimg.com/media/A0BRGqGCcAEBdHW.jpg:large with the dimensions 1,024px × 730px. This still isn't the original image.

I then made a well-educated guess and tried
https://pbs.twimg.com/media/A0BRGqGCcAEBdHW.jpg:orig and it actually worked; I got the original size image with dimensions 2,048px × 1,460px.

So all you need to do to obtain an original size image is to append »:orig« to the URL of the small version of the image.

Note that this only works for images uploaded to twitter not for images hosted on flickr.

Here is one example: https://twitter.com/VirtualAstro/status/241683461155475456 shows a nice photo of a blue moon; the 3 MP image can be found at https://pbs.twimg.com/media/A1qS3JvCQAE0QPv.jpg:orig

Friday, March 2, 2012

Easily Brighten Underexposed Areas of a Photo

In Overlay an Inverted Layer Onto a Photo to Brighten Underexposed Areas, PetaPixel shows how to do precisely that. I applied the method to a quite arbitrary underexposed photo and this is what I got:

Original image

Lit up using overlay method

Lit up, white balance applied

White balance only

A nice method indeed and it should work with any image processing program that's worth being used – in the article it's Photoshop while I have been using the Gimp.

Wednesday, January 4, 2012

Adblock plus showing ads?

You may have noticed that recent versions of Adblock plus do not filter out certain ads. Here is how to get rid of this “feature”:

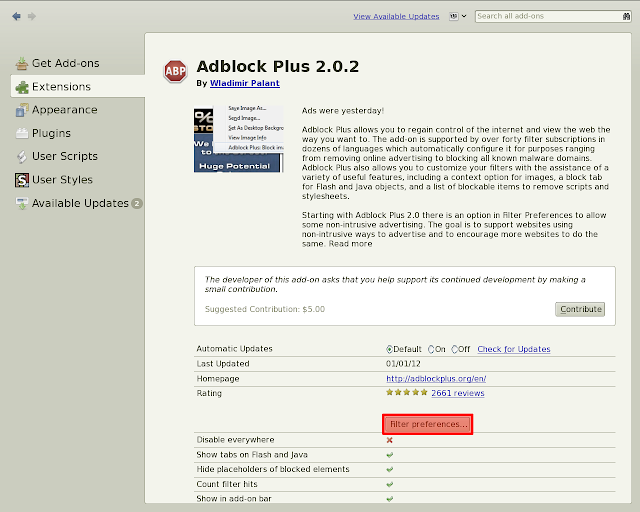
First you go to Tools → Addons → Extensions → Adblock Plus to open the Adblock Plus preferences and click on Filter Preferences…

Adblock Plus preferences
Alternatively you can right-click on the Adblock Plus Icon (an octagonal stop sign with the text ABP on it) to open its context menu and select Filter Preferences… or use the Ctrl+Shift+F shortcut. No matter which method you use, simply open the Adblock Plus Filter Preferences window.

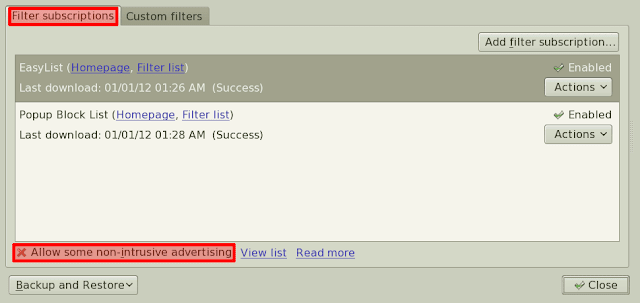
In this window go to the Filter subscriptions tab and uncheck Allow some non-intrusive advertising.

Adblock Plus Fiter Preferences:
Filter Subscriptions → Allow some non-intrusive advertising
That's it.

Friday, December 30, 2011

Print Edit

Print Edit allows editing of the web page content while in Print Preview mode. Editing the web page prior to printing can compact the layout and remove unwanted content such as adverts, sidebars and blank pages. Any element can be formatted, hidden or deleted.

UnloadTab

UnloadTab unloads inactive tabs in order to save resources. An unloaded tab is restored back to its original state when you need it again. Features include automatic and manual unloading of tabs, control over tab loading at Firefox start-up, and exclusion of tabs from unloading.

Extension Options Menu

Extension Options Menu adds extension options dialogs to the Tools or Titlebar menu; it also includes toolbar icon. Very handy if you have lots of add-ons.

Tuesday, December 27, 2011

Stylish

Stylish is a user styles manger that allows you to restyle the web. Stylish lets you easily install themes and skins for Google, Facebook, YouTube, Orkut, and many, many other sites. You can even customize Firefox and other programs themselves.

To give you an example of how to use Stylish allow me to use Google Reader. I cannot stand bright white backgrounds, reading text on them hurts my eyes. For this reason I use Stylish to change the look of Google Reader.

More precisely I essentially use Google Reader – Custom Color and Google Reader – Change the interface (which belong together). “Essentially” because I modified the colors used

fromto
rgb(223, 234, 248)#bbb
rgb(234, 248, 248)#bbb
rgb(233, 0, 0)#009
rgb(191,191,191)#ccc
#9bf#4d90f0
#eee#000

Google Documents Viewer

Google Documents Viewer allows you to open documents in Google Docs Viewer with a simple right click. View PDF, DOCX, XLSX and much more online with Google Docs Viewer. Supported Document Types are:
  • Microsoft Word (.DOC and .DOCX)
  • Microsoft Excel (.XLS and .XLSX)
  • Microsoft PowerPoint (.PPT and .PPTX)
  • Adobe Portable Document Format (.PDF)
  • Apple Pages (.PAGES)
  • Adobe Illustrator (.AI)
  • Adobe Photoshop (.PSD)
  • Tagged Image File Format (.TIFF)
  • Autodesk AutoCad (.DXF)
  • Scalable Vector Graphics (.SVG)
  • PostScript (.EPS, .PS)
  • TrueType (.TTF)
  • XML Paper Specification (.XPS)
  • Archive file types (.ZIP and .RAR)
No restart required.

Sunday, December 25, 2011

NetVideoHunter Video Downloader

NetVideoHunter Video Downloader is a very nice download helper tool that lets you easily collect and download videos and music from sites like Youtube, Facebook, Metacafe, Dailymotion, Break, VKontakte, DivShare and from many other sites…

Saturday, December 24, 2011

nextpage

nextpage allows you to use the space bar to go to the next page. The add-on rebinds SPC key so that it scrolls down the page as long as you are not at the button but then follows a link to the next page (provided there is one). You can also press n key anytime which will get you to the next page without first having to scroll to the bottom of the current page.

I now use Space Next instead.

Thursday, December 22, 2011

Some UTF-8 Settings for Thunderbird

It is beyond me why Thunderbird still sticks to outdated ISO 8859-1 as default setting for displaying and sending news. Fortunately it is easy to fix this and use UTF-8 instead:

Preference NameDefaultNew
intl.charset.defaultISO-8859-1UTF-8
mailnews.send_default_charsetISO-8859-1UTF-8
mailnews.view_default_charsetISO-8859-1UTF-8

Google Contacts

Google Contacts is a Thunderbird add-on which allows you to access your Google contacts and synchronize them with Thunderbird address books. It detects gmail accounts which have already set up and creates address books for each of them.

Cards in the address books are synchronized with Google contacts; they represent the current Google contacts contents and Google contacts will be modified when you modify the cards. TB's mailing lists and Google's contacts groups are synchronized in the same manner.

Thursday, December 8, 2011

Shrinking PNG images using pngcrush

pngcrush is a free, open source command-line utility for optimizing PNG image files. It reduces the size of the file losslessly – that is, the resulting "crushed" image will have the same quality as the source image… more on Wikipedia

Allow me to show you what pngcrush can and cannot do by illustrating it using Wikipe-tan, the moe anthropomorphism of Wikipedia (click on the images to see them at full size).

Here is the original Wikipe-tan image (well, actually a PNG rendering of the original SVG vector graphics):

Original Wikipe-tan
152,005 bytes

Applied to this particular image, pngcrush can generate a file that is 20 percent smaller – without any loss of image information.

Wikipe-tan after pngcrush
121,412 bytes

While pngcrush reduces the image size considerably, it cannot free you from optimizing the image, for example by deciding whether reducing the amount of data in a lossy manner is acceptable.

Wikipe-tan, 256 colors
42,658 bytes

For the last image it made no difference whether I use pngcrush or not, GIMP already created the optimally compressed version that is 72% smaller than the original. Whether the loss in quality is acceptable for this image or not depends on the background; on an unstructured background it may not be the best choice but if the background has some structure it works quite well. As always: It pays to know what you are doing ☺

As far as running pngcrush there is not much to say. Here is a normal run of the program:

pngcrush

And here is a run with the -brute option that tries each and any possible way of compressing.

pngcrush -brute

Note that while it sometimes yields better results, using -brute usually is just waste of time.

Wednesday, November 30, 2011

Google Calendar with Thunderbird or Seamonkey

Regardless whether you are using Thunderbird or SeaMonkey, chances are you want to integrate a Google calendar.

Mozilla Thunderbird 5.0 on GNU/Linux
screen shot from Wikipedia

SeaMonkey 2.5 on GNU/Linux
own screen shot, mail client window

The integration is quite simple. The first step is obtaining and installing Lightning, available for both Thunderbird (from this location, shown left) and SeaMonkey (from this location, shown right).

Obtaining lightning

For how to install Add-Ons in Thunderbird see this page; adding them to SeaMonkey is easier, here you just click on them.

While plain Lightning already is a nice calendar it ships with no support for Google Calendar. For this you also need Provider for Google Calendar, again available for both Thunderbird (from this location, shown left) and SeaMonkey (from this location, shown right).

Obtaining provider for Google Calendar
For an explanation on how to configure Lightning to access your Google Calendar, allow me to point you to make use of's “How To: Integrate Google Calendar Into Thunderbird”. Note that while the article explicitly mentions Thunderbird it also applies to SeaMonkey.

Tuesday, November 15, 2011

Youtube Videos on Blogger

Suppose you want to add http://www.youtube.com/watch?v=7XkmLj33Md0 – 「【鏡音リン】ココロ【手書きPV】」 – to a Blogger post. You are then presented the following three methods to do so:

Upload a file from your computer
Search a video on YouTube, then add it
Chose one of your YouTube videos

For legal reasons you can rule out the first and last option. So what remains is option 2: you need to search for the video by its Japanese description.

Even if you overcome the initial hurdle and manage to enter (or copy and paste) the title you are still in trouble: in this particular case you are presented with a lot videos that match the search term, all carrying descriptions in Japanese:

あなた(anata)(wa)日本語(nihongo)(ga)わかりますか(wakarimasuka)
Do you understand Japanese?
Fortunately there IS a simple solution to this problem that a) works without non-ASCII characters and b) results in precisely the video you want. The first idea is to paste the URL into the search box. Unfortunately this does not work out as expected:

Search for full URL
 But using the URL is almost the solution; what you actually need to use is the video’s id; in the case of  http://www.youtube.com/watch?v=7XkmLj33Md0, the ID is “7XkmLj33Md0”. Sometimes youtube URLs are longer, in such cases you need to locate the “v=” part and use everything up to a “&” or  “#” (it should have 11 characters).

Search for video ID only
As you see I am now presented just one single choice and it is the correct video. If you do not trust me try the above method using a different URL.

【鏡音リン】ココロ【手書きPV】

Tuesday, November 8, 2011

How to CSS a Table?

Imagine that you want to use CSS to give a table a certain design like the following one but do not want to go through the tedious process of manually tuning all the CSS.

Lorem Ipsum
Lorem ipsum dolor sit amet, consectetur adipisicing elit, sed do eiusmod tempor incididunt ut labore et dolore magna aliqua. Ut enim ad minim veniam, quis nostrud exercitation ullamco laboris nisi ut aliquip ex ea commodo consequat.
Duis aute irure dolor in reprehenderit in voluptate velit esse cillum dolore eu fugiat nulla pariatur. Excepteur sint occaecat cupidatat non proident, sunt in culpa qui officia deserunt mollit anim id est laborum.

This is where the “HTML and CSS Table Border Style Wizard” comes to the rescue, a tool that allows you to interactively create such a design. The tool may not look great but it is easy to use and invites to play with it ☺
Sorry, I accidentally introduced a typo into the style. Fixed now.

Saturday, November 5, 2011

Photo postprocessing

I took a photo of a plant with very nice flowers but unfortunately quite ugly brown spots on its leaves.


I then tried out how the same photo looks if I colorize it (in GIMP it is Colors → Colorize… with Hue 30, Saturation 50, and lightness 0).


As you see the leaves now look much better but the colorful flowers now do not look as bright as they did before. I therefore added a transparent layer to the first image, pasted the colorized version to this layer and then removed the colorized flowers so that the original version shines through. Here is the result of this operation:


Finally I applied some cropping and got:


I like the final result.